MikroTik Router Setup for a Small ISP: Full Guide
A practical MikroTik PPPoE server setup for small ISPs in Pakistan, written by network engineers who configure these routers for a living.
How to Configure a MikroTik Router for a Small ISP
We've set up MikroTik routers for internet providers all over Multan, from a five person setup running off a single hEX router to networks pushing several thousand subscribers through a CCR. The steps below are the same ones we walk through with our own clients and with students in our MikroTik training in Multan, so if you're new to this, you're getting the real workflow, not a simplified version of it.
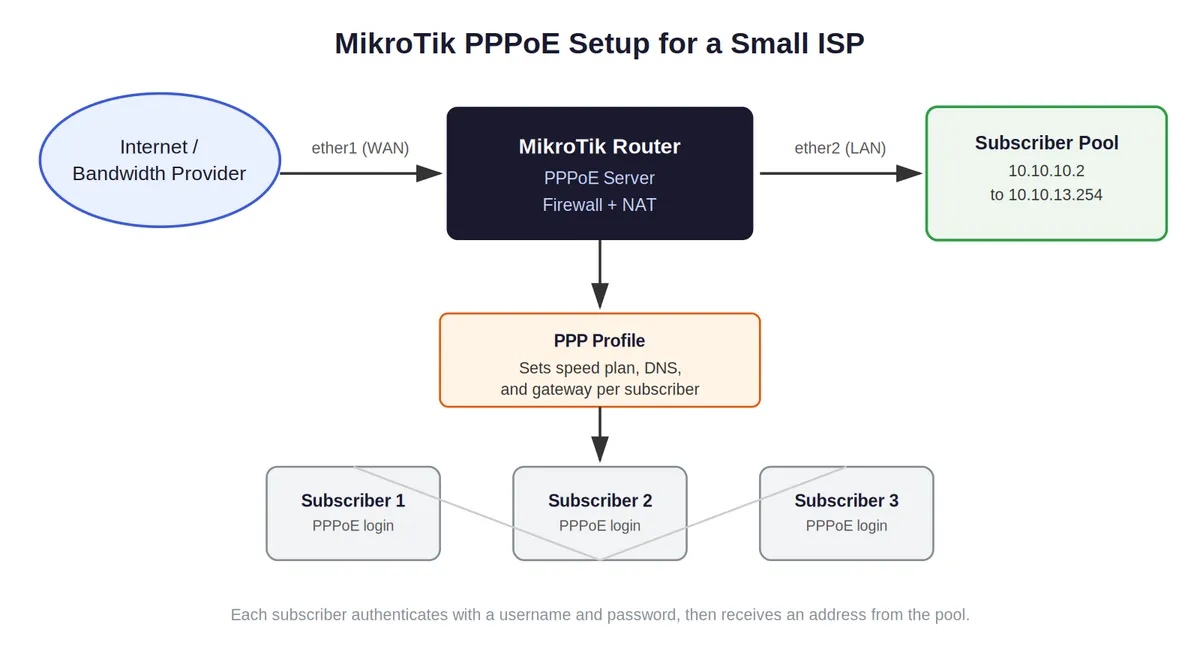
This is a MikroTik configuration for an ISP running PPPoE, meaning subscribers log in with a username and password rather than just plugging in and getting internet automatically. It's the standard for wired ISPs because it gives you control over who's connected, what speed they get, and the ability to cut someone off the moment their bill is overdue. We're assuming RouterOS 7 on a hEX or CCR series router, and that you're comfortable clicking around in Winbox or typing into the terminal.
What to have ready before you touch the router
Before opening Winbox, get these sorted:
A router with enough horsepower for your subscriber count. A hEX is fine for a few hundred lighter users. Once you're past a thousand sessions or pushing more than a gig of traffic, you're looking at a CCR2004 or similar.
Your uplink details from whoever supplies your bandwidth. That's either a static IP they've assigned you, or a PPPoE username and password if that's how they hand off the connection.
A subscriber addressing plan. Decide how many IP addresses you actually need before you start, not after you've already built the pool too small.
Physical access to the router, or at least a temporary cable connection for the first login. Don't try to do the initial setup remotely.
Logging in for the first time and locking it down
Plug a cable from your computer into any LAN port on the router (not the WAN port). Open Winbox, click the Neighbors tab, and the router should show up listed by its MAC address. Log in as admin with no password, since that's the factory default on a brand new unit.
The very first thing you do, before anything else, is set a real password:
We can't stress this one enough. Routers left with the default blank password get found and hijacked within hours of being connected to the internet, usually turned into spam relays or used in DDoS traffic. This single step prevents more security incidents than almost anything else on this list.
Setting up the WAN connection
How you configure this depends on what your bandwidth provider gives you.
If they hand you a static IP, it looks like this:
If your upstream is PPPoE instead:
Check that it actually connected before moving forward:
You want to see the status as running. If it's not, nine times out of ten it's either a typo in the username or password, or the wrong physical port was selected as the uplink.
Building the subscriber IP pool
This is the block of addresses handed out to paying subscribers when they connect. Size it based on your real subscriber count, plus some room for growth, rather than just grabbing a whole /24 because it seemed easy.
That gives roughly a thousand usable addresses. Adjust the range up or down based on your actual numbers.
Creating the PPP profile
The profile is what decides what each subscriber actually gets once they're connected: their gateway, their DNS, and most importantly for a business, their speed limit.
Set up one profile per speed package you sell, plan5mbps, plan10mbps, plan20mbps, and so on, rather than setting a rate limit on every individual subscriber. When you've got a few hundred customers spread across six packages, adjusting one profile beats editing every single account by hand.
Turning on the PPPoE server
This is the step that actually turns the router into an access point that authenticates your subscribers.
Two things matter here for a live network. First, leave PAP authentication unchecked, since it sends the password across the local network in plain text. Second, turn on one session per host, which stops a single login from being used on two routers at once, a common way for two households to quietly split one subscription.
Adding subscriber accounts
For a small number of customers, adding them individually works fine:
Once you're past roughly a hundred or two hundred subscribers, move authentication over to RADIUS instead of managing every account by hand inside RouterOS. This is also what lets your billing software disconnect anyone who hasn't paid automatically, instead of someone logging into Winbox to do it manually every month.
NAT, so subscribers can actually reach the internet
Subscribers are sitting on private addresses from the pool you built earlier, so they need translating to your public WAN address:
Firewall rules that protect the router itself
This is the part most small ISPs skip, and it's usually what gets a router compromised. At a minimum, you want something like:
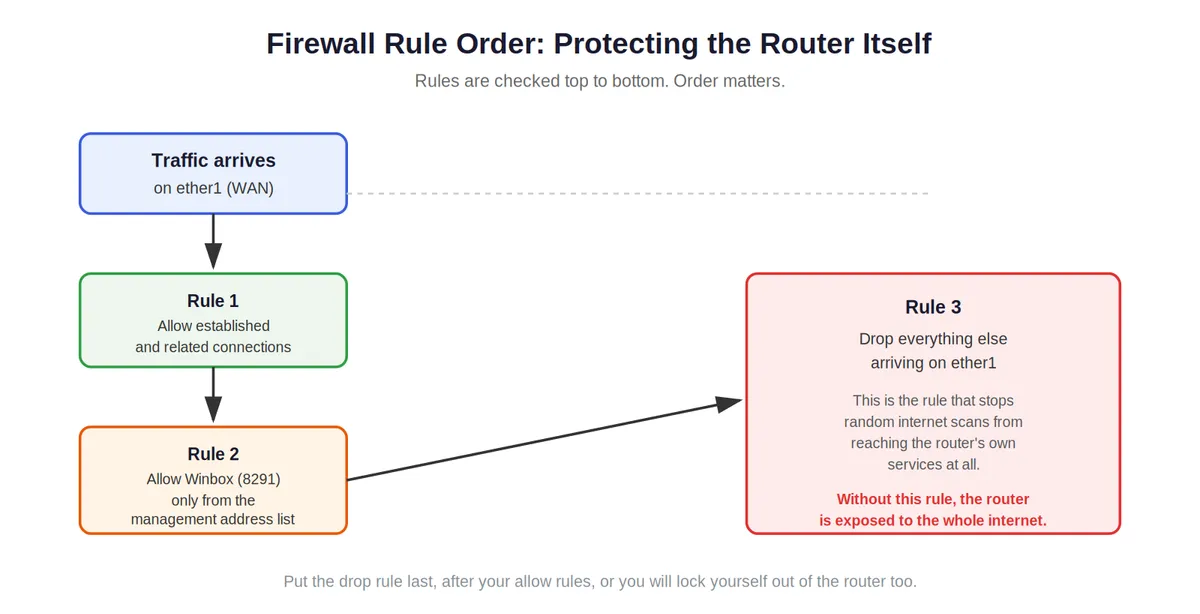
Build an address list called management containing only your own office IP or VPN range, and place these rules above everything else. Without this, the router's Winbox and API ports are reachable from anywhere on the internet, and that's exactly how the majority of compromised MikroTik routers ended up in a botnet in the first place.
Checking your work before calling it finished
Run through these before you walk away:
/ppp active print shows you whether subscribers are actually authenticating.
/interface pppoe-server print confirms the service is running on the interface you meant it to.
Connect a test device using a real subscriber login and confirm it picks up an address from the pool and can browse normally.
Run a speed test from that test device and check it matches the profile's rate limit.
Mistakes we see again and again
Setting rate limits on individual accounts instead of on the profile. It works fine when you've got twenty customers, and turns into a mess once you're at two hundred and need to run a promotion or change pricing.
Never backing up the configuration. Export it after every change you make:
Then actually move that file somewhere off the router, not just leave it sitting there.
Running everything, PPPoE, DNS, DHCP, hotspot, and file sharing, off one box. Fine when you're small. Past a couple hundred subscribers, it's worth splitting these across separate hardware or at least keeping your internet facing edge separate from internal services.
No monitoring on CPU load or session counts. A CCR that handles three hundred sessions comfortably can start choking at six hundred if your firewall rules aren't efficient. This is where a proper network monitoring setup earns its keep. Tools like PRTG or LibreNMS running as a cloud NMS in Pakistan will flag rising CPU or session counts long before subscribers start calling to complain.
When it's time to bring someone in
Everything above is manageable if you're comfortable with basic networking. Where it gets genuinely harder to handle solo is connecting RADIUS to a billing system, setting up failover between two routers, segmenting VLANs across multiple access switches, and auditing firewall rules as the network keeps growing. That's usually the point where ISPs in Multan either bring in a network engineer for the initial build and keep managing day to day themselves, or hand off the whole thing including ongoing monitoring and support.
Alnafy Solutions and Institute designs and manages MikroTik networks for ISPs across Multan, from a single router setup to multi site deployments with RADIUS billing built in. If your network has outgrown what one person can manage by hand, get in touch for a network review. If you'd rather learn to do this yourself, this is exactly what we teach hands on in our MikroTik and networking courses at what students tell us is the best IT training institute in Multan for actually getting your hands on real equipment.
Frequently Asked Questions
Quick answers and key troubleshooting tips related directly to this article.
About the Author
Alnafy Engineer is a knowledgeable contributor sharing expertise and insights on technology and business topics.
Comments
Leave a Comment
Your comment will be reviewed by our team before appearing.
Loading comments...